
Did you know that 75% of consumers prefer handcrafted wooden wall clocks over mass-produced ones? These pieces not only tell time but also serve as stunning decorative elements. This guide will walk you through the process of making a theater-themed clock that blends functionality with artistic flair.
Using wood as the primary material, this project focuses on creating a design that captures the essence of a theater. The clock’s gear mechanism ensures precision, while its hand-crafted details add a personal touch. Whether you’re a DIY enthusiast or a beginner, this step-by-step guide makes the process straightforward and enjoyable.
This clock is more than just a timepiece. It’s a statement piece that enhances any room’s aesthetic. Perfect for your wall, it combines artistry with practicality, making it a memorable addition to your home decor.
Key Takeaways
- Handcrafted wooden clocks are preferred by 75% of consumers for their unique appeal.
- Wood and precise gear mechanisms ensure durability and accuracy.
- The theater-inspired design adds a creative touch to any space.
- This project is beginner-friendly and includes detailed instructions.
- The clock serves as both a functional and decorative element.
Introduction to Your Theater-Themed Wooden Clock Project
Imagine transforming your space with a unique timepiece that blends artistry and function. This project invites you to craft a stunning decorative item that tells time while capturing the essence of theater. It’s more than just a clock—it’s a conversation starter and a testament to your creativity.
Combining theater-inspired aesthetics with classic clockmaking, this project emphasizes both beauty and precision. You’ll learn essential design and construction techniques, ensuring your creation is as functional as it is visually appealing. Whether you’re a seasoned DIYer or a beginner, this guide makes the process accessible and enjoyable.

The influence of this project extends beyond timekeeping. It enhances the artistic ambiance of any room, making it a focal point of your decor. By integrating theatrical elements, you’ll create a piece that stands out and reflects your personal style.
Here’s a quick overview of what lies ahead:
| Step | Focus |
|---|---|
| 1 | Planning and design |
| 2 | Material selection |
| 3 | Construction techniques |
| 4 | Final touches and installation |
“A well-crafted clock is not just a tool—it’s a piece of art that tells a story.”
As you embark on this journey, you’ll discover how the right materials and careful planning can bring your vision to life. From selecting the perfect wood to understanding the mechanics of timekeeping, every step is designed to inspire and empower you.
Gathering Essential Materials and Tools
Starting your project requires careful selection of essential items and equipment. The right package of tools and material ensures a smooth and efficient process. This section will guide you through the necessary design tools, woodworking equipment, and other resources to bring your vision to life.

Design Tools and Software
Accurate planning is key to success. Use CAD software like Blender or OpenOffice Calc to draft precise gear designs. These tools help you visualize the final product and ensure all components fit perfectly. Additionally, stencil templates can simplify the process of creating intricate patterns.
Woodworking Equipment Checklist
High-quality wood and the right machine tools are essential for durability and precision. Here’s a detailed checklist of equipment you’ll need:
| Tool | Purpose |
|---|---|
| Scroll Saw | Cutting intricate shapes and gears |
| Drill Press | Creating precise holes for assembly |
| Miter Saw | Cutting wood to accurate lengths |
| Clamps | Holding pieces securely during assembly |
| Spray Adhesive | Ensuring strong and efficient bonding |
Using tools like a scroll saw and drill press ensures clean cuts and precise measurements. Spray adhesives, such as 3M Super77, provide a reliable way to assemble components without compromising quality.
By gathering the right tools and materials, you set the stage for a successful project. Quality items not only make the process easier but also ensure your final product is both functional and visually stunning.
Understanding Clock Mechanisms and Timekeeping Fundamentals
The secret behind precise timekeeping lies in the clock’s inner workings. At its core, a clock relies on a mechanism that converts energy into motion. This process ensures every second, minute, and hour is measured accurately.
Most traditional clocks use a weight-driven system. The energy from a falling weight powers the gear train, which drives the clock’s hands. This system is both reliable and efficient, making it a popular choice for centuries.

The escapement is another critical component. It regulates the release of energy, creating the familiar “tick-tock” sound. Without it, the weight would drop too quickly, and the clock would lose accuracy.
Gears play a vital role in transmitting motion. They ensure the minute and hour hands move at the correct speed. Precise machine and gear ratios are essential for maintaining accurate time.
Here’s a breakdown of how these components work together:
| Component | Function |
|---|---|
| Weight | Provides energy to power the clock |
| Escapement | Regulates energy release and creates sound |
| Gears | Transmit motion to the hands |
| Hands | Display the time |
By understanding these fundamentals, you gain insight into the precision and artistry behind every clock. The interplay of weight, gears, and the escapement ensures your timepiece functions flawlessly, keeping you on schedule.
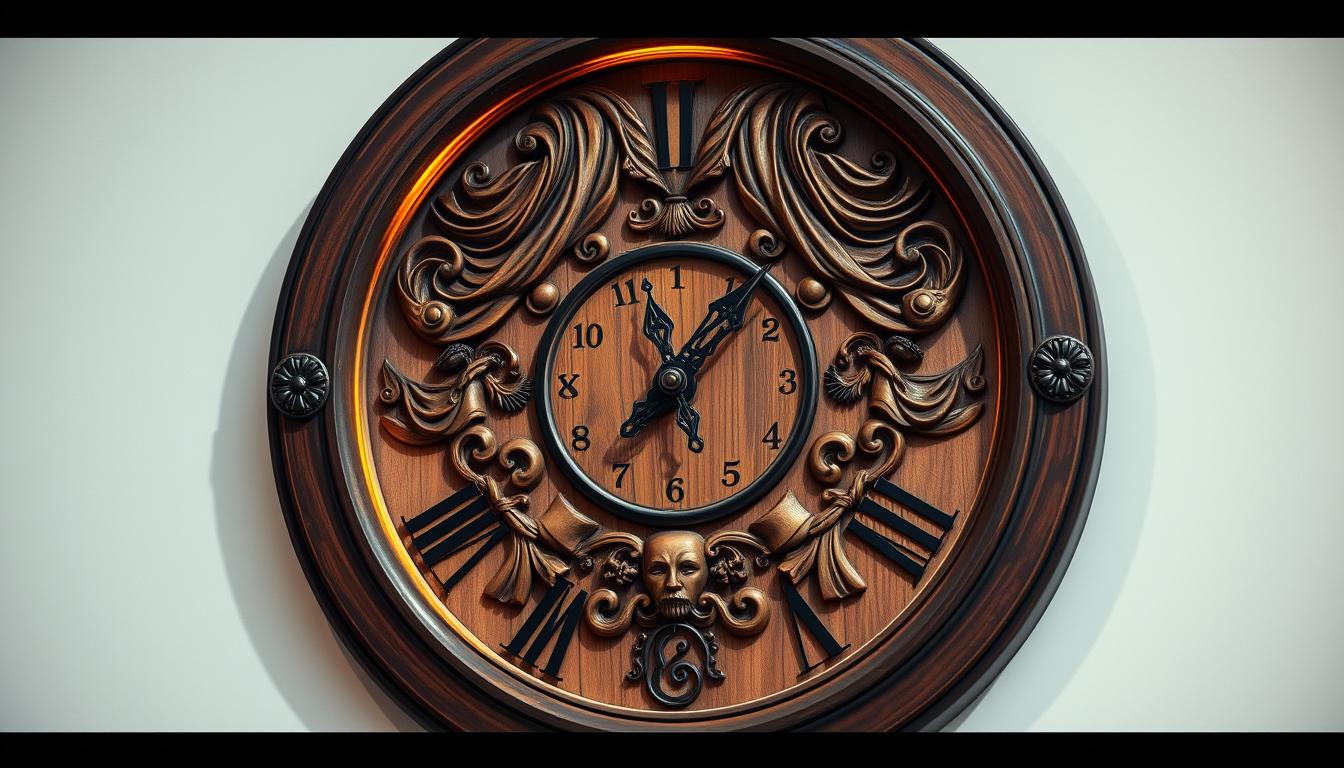
The History and Aesthetic of Theater-Inspired Designs
Theater-inspired designs have shaped art and functionality for centuries. From the basic pendulum clocks of the 1600s to today’s decorative pieces, timekeeping has evolved into an art form. Theatrical elements like stagecraft and drama have played a significant role in this transformation.
Stagecraft’s influence is evident in the design of modern timepieces. Dramatic lighting, bold shapes, and intricate details mimic the look of a theater stage. These elements add a sense of light and movement, making the piece visually captivating.

Every side of a theater-inspired clock tells a story. The front might feature bold numerals or intricate patterns, while the back often showcases craftsmanship. This duality allows the piece to show personality and artistic depth.
“A clock is more than a timekeeper—it’s a reflection of creativity and history.”
By blending historical influences with modern aesthetics, these clocks become more than functional items. They serve as conversation starters and artistic statements, enhancing any space they occupy.
Planning Your Clock Design Layout
Designing a clock that captures the essence of theater requires thoughtful planning and creativity. Start by drafting a detailed layout using design software. This ensures every element aligns perfectly, blending functionality with artistic flair.

Place the frame at the center of your layout. This creates balance and draws attention to the clock’s main feature. Surround it with side elements that evoke a theatrical ambiance, such as intricate patterns or dramatic shapes.
Choose wood textures that complement your design. The right grain and finish can enhance the overall aesthetic, making your piece stand out. Coordinating these elements ensures a cohesive and visually appealing result.
“A well-planned design is the foundation of every masterpiece.”
Careful planning leads to a seamless integration of aesthetic and practical features. By focusing on details, you create a clock that’s both functional and a work of art.
Integrating Theatrical Elements into Your Design
Incorporate elements like stage lighting effects or bold numerals to mimic a theater’s dramatic atmosphere. These touches add depth and personality to your creation.
Use design software to experiment with different layouts. This allows you to visualize how each element fits together, ensuring a harmonious final product. Attention to detail during this phase pays off in the end.
By combining creativity with precision, you craft a clock that tells time and tells a story. It’s a piece that reflects your artistic vision and enhances any space.
Exploring Clock Hands, Numbers, and Decorative Features
Every clock tells a story, and its hands and numbers play a vital role in that narrative. These elements are not just functional; they also contribute to the overall design and aesthetic appeal. Understanding their roles helps you create a timepiece that’s both accurate and visually stunning.

Minute, Hour, and Second Hand Functions
The minute hand is responsible for tracking the passage of time in smaller increments. It moves steadily, ensuring you can read the exact minute. The hour hand, on the other hand, moves more slowly, marking the progression of each hour. Together, they provide a clear and precise reading of the current time.
The second hand adds a dynamic element to the clock. Its continuous motion creates the familiar “tick” sound, symbolizing the relentless march of time. While it may seem minor, the second hand enhances the clock’s functionality and adds a layer of detail to its design.
Here’s a breakdown of how these hands work together:
| Hand | Function |
|---|---|
| Minute Hand | Tracks minutes with steady movement |
| Hour Hand | Marks the progression of hours |
| Second Hand | Provides continuous motion and sound |
Numbers and markers are equally important. They serve as reference points, making it easier to read the time. Whether you choose Roman numerals, Arabic digits, or simple markers, they add both functionality and decorative charm to your design.
“The hands and numbers of a clock are its language, telling the story of time with precision and elegance.”
Balancing these elements is key to achieving accurate hour readings and a cohesive design. By paying attention to details, you create a clock that’s not just a timekeeper but also a work of art.
Construct a theater-themed wooden clock for the wall.
The construction phase brings your vision to life with precision and creativity. Begin by preparing the wooden board and frame. Ensure the surface is smooth and ready for drilling. This step sets the foundation for a sturdy and visually appealing piece.

Next, focus on drilling multiple holes with accuracy. Use guides to position the gears and axles perfectly. This ensures the weight-driven mechanism operates seamlessly. Proper alignment prevents the weight from hitting the floor prematurely, maintaining the clock’s functionality.
Integrate design elements while ensuring structural integrity. Theatrical details like bold numerals or intricate patterns add personality. Balance these features with the practical aspects of the build. This harmony creates a piece that’s both functional and artistic.
“Precision in construction ensures a clock that’s as reliable as it is beautiful.”
Pay close attention to gear placements. Aligning them correctly is crucial for accurate timekeeping and aesthetic balance. Each component should work together smoothly, reflecting the care and effort put into the project.
By following these steps, you create a timepiece that’s more than just functional. It’s a statement of craftsmanship and creativity, ready to enhance any space it occupies.
Step-by-Step Guide to Crafting the Clock Face and Frame
Crafting the clock face and frame is a critical step in ensuring both functionality and aesthetics. This process requires attention to detail and precise execution. Follow these steps to create a flawless design.
Start by printing out your full-size design. Glue the sheets to the wood surface, ensuring they are smooth and free of wrinkles. This step helps transfer your design accurately.

Next, cut the clock face using a scroll saw. Take your time to follow the lines precisely. A clean cut ensures a professional finish. Once the face is ready, prepare the wooden frame by sanding the edges for a smooth finish.
Mark the center hole using a dowel for alignment. This step is crucial for ensuring the gears and hands fit perfectly. Use a drill press to create the hole, ensuring it’s straight and accurate.
“Precision in alignment guarantees a clock that works as beautifully as it looks.”
Here’s a breakdown of the key steps:
| Step | Action |
|---|---|
| 1 | Print and glue the design to wood |
| 2 | Cut the clock face with a scroll saw |
| 3 | Sand the frame edges for smoothness |
| 4 | Mark and drill the center hole |
Each piece must align perfectly to ensure smooth operation. This way, your clock will function flawlessly while maintaining its artistic appeal. Take your time during this step to achieve the best results.
By following these instructions, you create a clock that’s both functional and visually stunning. Precision and care in this step lay the foundation for a timepiece you’ll be proud to display.
Designing a Functional Gear Train for Accurate Timekeeping
Precision in timekeeping starts with a well-designed gear train. This system ensures your hour and minute hands move accurately, while the second hand maintains consistent motion. Understanding how to calculate gear ratios and dimensions is essential for creating a reliable mechanism.

Calculating Gear Ratios and Dimensions
To achieve accurate timekeeping, you need to calculate the gear ratios correctly. Start by determining the number of teeth for each gear. Use spreadsheets to simplify this step, ensuring the minute hand completes one full rotation every 60 minutes and the hour hand every 12 hours.
The diameter of each gear is derived from its diametral pitch and tooth count. This ensures smooth interaction between gears, minimizing friction and wear. Proper sizing is crucial for maintaining the clock’s precision over time.
“Accurate gear ratios are the backbone of any reliable timekeeping mechanism.”
Fundamentals of the Escapement Mechanism
The escapement mechanism regulates the release of energy, controlling the clock’s motion. It ensures the second hand moves in precise increments, creating the familiar “tick-tock” sound. Without it, the clock would lose accuracy quickly.
Modern adaptations often include a battery-backed timer for additional precision. This feature ensures the clock remains accurate even during power interruptions. Combining traditional and modern techniques enhances both functionality and reliability.
Here’s a breakdown of key components and their roles:
| Component | Function |
|---|---|
| Gears | Transmit motion to the hands |
| Escapement | Regulates energy release |
| Battery Timer | Ensures precision during interruptions |
By mastering these fundamentals, you create a gear train that delivers both accuracy and durability. Every step in the design process contributes to a timepiece that’s as reliable as it is beautiful.
Creating a Smooth and Swinging Pendulum
The pendulum is the heart of your clock, dictating its rhythm and precision. Its steady swing ensures accurate timekeeping, making it a critical component of the mechanism. Understanding its physics and proper installation is essential for a reliable timepiece.
A pendulum’s period is determined by its length. Longer pendulums swing slower, while shorter ones move faster. This principle allows you to fine-tune the timekeeping accuracy of your clock. Careful weight management also plays a role in maintaining balance and consistency.

To ensure smooth operation, install the pendulum at the center of the mechanism. Proper alignment prevents friction and ensures the hands move accurately. Use a secure mounting system to keep it stable during operation.
For added reliability, consider integrating a battery-assisted element. This feature ensures the pendulum continues swinging even during minor disruptions. It’s a practical solution for maintaining consistent timekeeping.
“A well-balanced pendulum is the key to a clock that keeps perfect time.”
Practical tips can help keep your pendulum swinging without interruption. Regularly check for obstructions and ensure the weight is evenly distributed. These small steps contribute to the longevity and accuracy of your clock.
By mastering these techniques, you create a pendulum that’s both functional and reliable. It’s the foundation of a timepiece that combines artistry with precision.
Precision Cutting Techniques for Wooden Gears
Achieving precision in wooden gear cutting is essential for a flawless clock mechanism. Each gear must fit perfectly to ensure smooth operation and accurate timekeeping. Start by marking the outline of each gear on the wood surface. Use a ruler and protractor to measure angles and dimensions carefully.

Once marked, prepare the wood for cutting. Secure the piece firmly to prevent movement during the process. A stable setup ensures clean and accurate cuts. Use a drill press to create drill holes for the axles. This step ensures the gears rotate smoothly without friction.
Next, use a scroll saw to cut the gears. Move the blade slowly to avoid splintering or uneven edges. Take your time to follow the marked lines precisely. Smooth edges are crucial for proper gear interaction and long-term durability.
“Precision in cutting transforms raw materials into functional works of art.”
After cutting, double-check each gear using a window template. Place the template over the gear to confirm its size and shape. This visual confirmation ensures accuracy before assembly. Small adjustments can be made at this stage to perfect the fit.
Here’s a summary of the key steps:
| Step | Action |
|---|---|
| 1 | Mark and measure the gear outline |
| 2 | Secure the wood and drill axle holes |
| 3 | Cut the gear using a scroll saw |
| 4 | Check the gear with a window template |
By following these techniques, you ensure each gear fits perfectly into your design. Precision cutting is the foundation of a clock that’s both functional and visually stunning.
Assembling the Clock: From Drilling to Final Fit
Assembling your timepiece requires precision and attention to detail. Every step in the process ensures the final product functions flawlessly. Begin by marking the center hole on the frame. This is crucial for aligning the axles and gears accurately.

Use a dowel or brad nail to mark the correct center position. This technique ensures symmetry and prevents misalignment. Double-check the size of each hole to ensure a snug fit for all components.
Next, drill the holes using a drill press. This tool provides the precision needed for clean and accurate cuts. Make sure each hole is straight and evenly spaced. Proper alignment prevents friction and ensures smooth operation.
“Precision in drilling is the foundation of a well-functioning clock.”
After drilling, assemble the components onto the frame. Start with the axles and gears, ensuring they fit perfectly. Use a mirror-image template to confirm alignment on both sides. This step guarantees consistency and avoids malfunctions.
Here’s a breakdown of the key steps:
| Step | Action |
|---|---|
| 1 | Mark the center hole using a dowel |
| 2 | Drill holes with a drill press |
| 3 | Assemble axles and gears onto the frame |
| 4 | Check alignment with a mirror-image template |
By following these instructions, you ensure every hole and component aligns perfectly. Precision in assembly leads to a timepiece that’s both functional and visually stunning.
Aligning Axles and Drilling Accurate Holes
Proper alignment of axles is essential for smooth operation. Use a drill press to create precise holes for each axle. This ensures they rotate without friction or misalignment.
Make sure to check the size of each hole before inserting the axles. A snug fit prevents wobbling and ensures stability. Take your time during this step to achieve the best results.
By focusing on precision, you create a clock that’s as reliable as it is beautiful. Every detail matters in crafting a timepiece that stands the test of time.
Final Touches: Sanding, Finishing, and Adding Numbers
The final touches bring your project to life, ensuring it’s both functional and visually stunning. Begin by sanding the wood surfaces to remove any rough edges or imperfections. This step ensures a smooth finish and prepares the surface for the next stage.

Apply a protective finish to enhance the wood’s natural beauty and durability. Choose a high-quality material like General Finishes Arm-R-Seal Oil Based Topcoat for a professional look. This not only protects the wood but also adds a refined touch to your design.
Next, focus on placing the numbers accurately on the clock face. Use stencils or templates to ensure precise alignment. This step is crucial for readability and adds a polished look to your creation.
“A well-finished clock is a testament to craftsmanship and attention to detail.”
Consider adding a subtle light element to highlight the clock’s features. This could be an LED strip or a small spotlight that enhances the overall aesthetic. It’s a small addition that makes a big impact.
Finally, perform a thorough check of the frame and overall structure. Ensure all components are securely in place and the mechanism operates smoothly. This final inspection guarantees your clock is ready for installation.
| Step | Action |
|---|---|
| 1 | Smooth surfaces with sanding |
| 2 | Apply a protective finish |
| 3 | Place numbers accurately |
| 4 | Add a light element |
| 5 | Inspect the frame and structure |
By following these steps, you ensure your clock is both beautiful and functional. The right finish and attention to detail make it a standout piece in any room. For more inspiration on using high-quality materials, explore our resources.
Practical Installation: How to Hang Your Clock on the Wall
Hanging your timepiece securely ensures it becomes a lasting centerpiece in your space. Proper installation not only enhances its visual appeal but also protects its delicate mechanism. Follow these steps to achieve a flawless display.

Tips for Secure Mounting and Display
Start by choosing the right location on your wall. Ensure the area is sturdy and free from obstructions. Use a stud finder to locate the best spot for mounting. This prevents the piece from shifting or falling over time.
Attach metal bars or dowels to the back of the clock for added stability. Secure them with screws or brackets included in the package. Double-check the alignment to ensure the clock hangs straight and level.
“A well-mounted clock is both a functional and decorative asset to any room.”
Here’s a quick guide to ensure a smooth installation:
- Use a level to confirm the clock is straight before finalizing the mount.
- Choose hardware that matches the weight of the clock for added security.
- Verify all components, including dowels and brackets, are properly installed.
- Test the clock’s stability by gently nudging it after hanging.
By following these steps, you ensure your timepiece is securely displayed and protected. A well-installed clock not only tells time but also enhances the aesthetic of your space.
Maintenance Tips for Long-Lasting Performance
Keeping your timepiece in top shape ensures it remains a reliable and beautiful addition to your space. Regular maintenance not only preserves its accuracy but also enhances its visual appeal. Follow these practical tips to keep your clock functioning flawlessly for years to come.
Start by cleaning the clock face and frame periodically. Use a soft cloth to remove dust and avoid harsh chemicals that could damage the finish. This simple step ensures your clock stays visually appealing and free from buildup.
Inspect the gear train and machine components for wear. Over time, gears may loosen or become misaligned, affecting performance. Tighten any loose fittings and ensure all parts move smoothly. This way, you prevent potential issues before they escalate.
Timely lubrication is essential for maintaining the mechanism’s smooth operation. Apply a small amount of clock oil to the gears and axles. Avoid over-lubricating, as excess oil can attract dust and debris.
“A well-maintained clock is a testament to both craftsmanship and care.”
Periodically check for loose package fittings. Ensure all screws and brackets are secure to prevent the clock from shifting or falling. This step ensures stability and protects the delicate internal components.
Finally, adjust the clock’s mechanism to maintain perfect time. Use a reliable reference to synchronize the hands and ensure accuracy. Regular adjustments keep your clock functioning as intended.
| Maintenance Task | Purpose |
|---|---|
| Cleaning | Removes dust and preserves appearance |
| Gear Inspection | Ensures smooth operation |
| Lubrication | Reduces friction and wear |
| Fitting Check | Prevents instability |
| Time Adjustment | Maintains accuracy |
By following these maintenance practices, you ensure your clock remains both functional and visually stunning. Consistent care extends its lifespan and keeps it a cherished part of your decor.
Conclusion
Your journey in crafting a unique timepiece has come to a rewarding conclusion. From designing the layout to assembling the gear train, each step required precision and attention to detail. The result is a stunning piece that blends functionality with artistic flair.
Throughout this project, you’ve learned the importance of accurate gear ratios and the role of the escapement in maintaining precise time. These lessons ensure your creation not only looks beautiful but also functions flawlessly.
Now, it’s time to proudly display your work. Whether it’s on a wall or a table, this piece will showcase your creativity and craftsmanship. Invite friends and family to admire your masterpiece and share the joy of creation.
As you admire your finished clock, consider exploring more creative projects. Each new endeavor builds on the skills you’ve developed, opening windows to endless possibilities. Enjoy your creation and let it inspire future innovations.
FAQ
What tools do I need to build a wall clock?
You’ll need woodworking tools like a saw, drill, sandpaper, and measuring tape. For the mechanism, gather gears, hands, and a battery. Design software can help plan the layout.
How do I choose the right wood for the clock face?
Select durable wood like oak or maple. Ensure it’s smooth and thick enough to hold the mechanism. The finish should match your design aesthetic.
How do I align the clock hands correctly?
Start by placing the hour hand, followed by the minute hand. Ensure they move freely and align with the numbers on the face. Use the center hole for precise placement.
What’s the best way to hang the clock securely?
Measure the wall and drill a hole for the mounting bracket. Use a level to ensure it’s straight. Make sure the bracket supports the clock’s weight.
How do I maintain the clock for long-lasting performance?
Regularly check the mechanism and replace the battery as needed. Dust the face and hands gently. Avoid exposing it to extreme temperatures or moisture.
Can I customize the clock with theatrical elements?
Yes, incorporate features like curtains, stage lights, or ticket designs. Use paint or carvings to add these details to the frame or face.
What’s the importance of gear ratios in the mechanism?
Gear ratios ensure accurate timekeeping. Calculate them based on the clock’s size and the movement of the hands. Proper ratios prevent time discrepancies.
How do I drill precise holes for the mechanism?
Measure the diameter of the axles and use a drill bit of the same size. Mark the center hole carefully and drill slowly to avoid splitting the wood.
What finish should I use for the clock?
Choose a finish like varnish or stain to protect the wood. Apply it evenly and let it dry completely before assembling the clock.
How do I ensure the pendulum swings smoothly?
Adjust the length and weight of the pendulum for balanced movement. Ensure the escapement mechanism is properly aligned for consistent swings.
