
Over 60% of home theater enthusiasts struggle with speaker placement in rooms smaller than 12×10 feet. Yet, immersive audio isn’t reserved for sprawling spaces. Modern solutions let you achieve cinematic sound even in compact areas—without sacrificing quality.
Creating a balanced audio environment in limited square footage requires smart planning. You’ll need to rethink traditional layouts while maintaining precise speaker angles and distances. Strategic positioning of rear and side channels becomes critical when walls feel closer than ideal.
This guide reveals techniques used by professional installers to adapt high-performance setups. Discover how to leverage wall materials, furniture placement, and advanced calibration tools. Even rooms as compact as 4×3 meters can deliver theater-grade acoustics when optimized correctly.
You’ll learn to balance directional accuracy with spatial limitations, ensuring dialogue clarity and impactful bass. Modern receivers with room correction software help compensate for challenging layouts. The result? A system that disappears into your space—until the sound pulls you into the action.
Key Takeaways
- Optimize speaker angles for precise sound imaging in compact rooms
- Use wall-mounted or compact speakers to save floor space
- Leverage acoustic treatment to minimize reflections
- Implement room correction software for automatic calibration
- Prioritize front channels while integrating surround elements
- Experiment with vertical placement for height effects
Understanding Your Room Constraints
Compact rooms under 130 square feet demand innovative audio solutions to prevent sound distortion. Your 4×3 meter space creates unique challenges: limited speaker-to-listening distances (2m front, 1m rear) and amplified reflections. Wall proximity becomes your primary design factor, influencing every placement decision.

Mapping Spatial Limitations
Start by measuring these three elements:
| Challenge | Impact | Solution |
|---|---|---|
| Ceilings under 8ft | Vertical sound compression | Downward-firing speakers |
| Walls within 1.5m | Early reflections | Absorption panels at first reflection points |
| Asymmetrical layout | Imbalanced imaging | Variable speaker toe-in angles |
Acoustic Optimization Tactics
In tight spaces, every surface matters. Position thick curtains on side walls to tame high-frequency bounce. Use bass traps in corners where low frequencies accumulate. For irregular room shapes, create a triangular listening zone between main speakers and seating.
Professional installers often recommend this sequence:
- Identify primary reflection points using mirror method
- Measure decay times with smartphone apps
- Install treatment at ceiling-wall junctions first
Assessing Your Audio System Goals
Defining your audio priorities transforms cramped spaces into precision-tuned entertainment zones. Unlike larger rooms, compact setups thrive on strategic balance between immersion and practicality. Target 70dB baseline volume with 90dB peaks—enough to feel explosions without overwhelming nearby walls.

Gaming demands precise directional cues, while movies require seamless panning effects. Music lovers should prioritize midrange clarity over thunderous bass. Your choice here dictates speaker positioning—front-heavy layouts for dialogue clarity or wider dispersion for ambient effects.
Consider these factors when planning:
- Wall-mounted speakers preserve floor space but require precise angling
- Phantom center channels reduce visual clutter in narrow rooms
- Acoustic panels enhance detail retrieval more than expensive gear upgrades
Professional calibration tools help overcome asymmetrical layouts. Modern receivers analyze room dimensions automatically, adjusting delays and EQ settings. For DIY setups, follow our home theater checklist to avoid common installation pitfalls.
Budget-conscious solutions exist at every level. Compact satellite speakers paired with a capable subwoofer often outperform bulky towers in tight quarters. Remember: spatial accuracy beats raw power when walls sit mere feet from your ears.
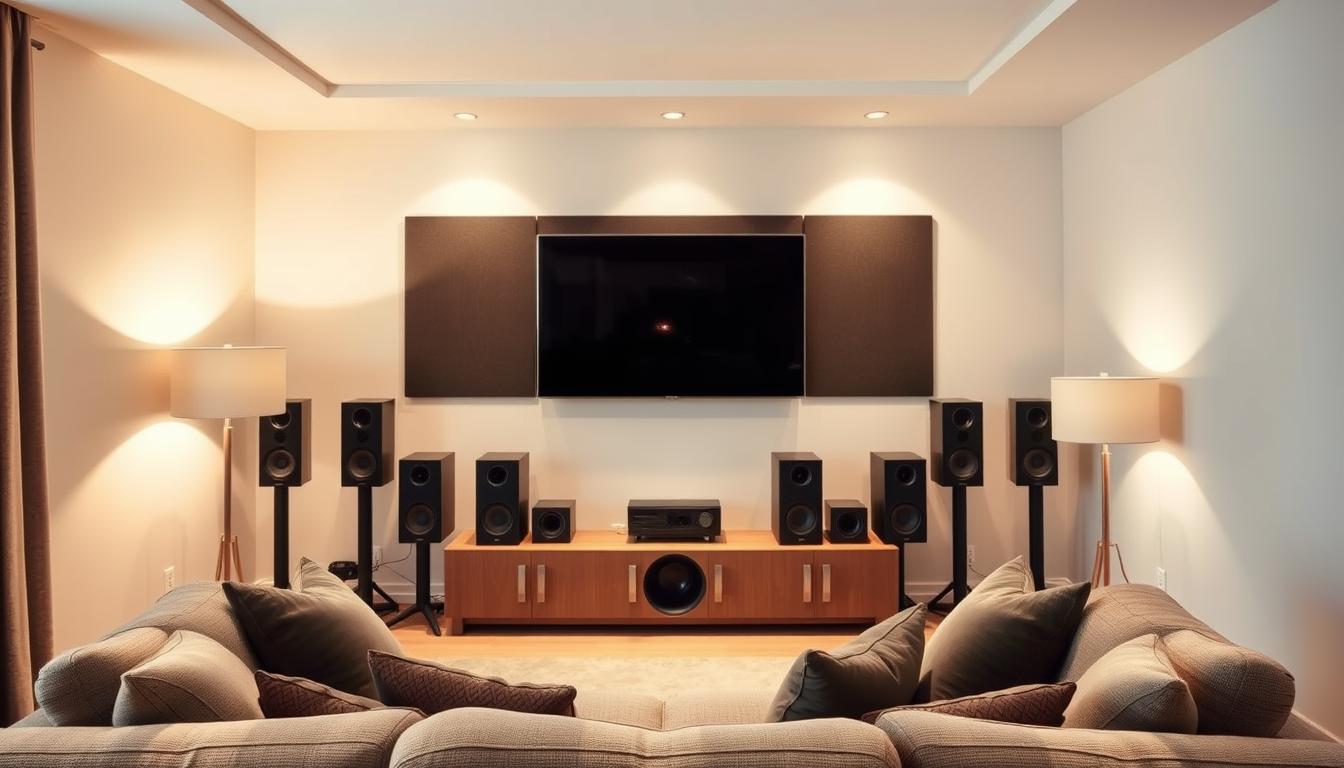
Introduction to 7.1 Surround Systems
True cinematic immersion begins with understanding your audio system’s architecture. A 7.1 surround configuration uses eight speakers to create precise directional effects: front left, center, front right, two side surrounds, two rear surrounds, and a subwoofer. This layout outperforms 5.1 setups by adding dedicated rear channels, critical for accurate sound placement behind listeners.

The numbering “7.1” reveals its capabilities: seven bed layer speakers handle directional audio, while the “.1” represents low-frequency effects. For gaming, this means hearing enemy footsteps approach from specific angles. Movie lovers experience helicopter flyovers that transition seamlessly from front to rear channels.
“A well-tuned 7.1 setup acts like an acoustic GPS, mapping sounds within inches of their intended location,” notes home theater designer Lauren Cole.
Upgrading to Dolby Atmos transforms this foundation. Adding four overhead speakers creates a 7.1.4 system—requiring receivers with 11 powered channels. Most modern AV processors support this expansion, letting you scale your system as needs evolve.
| Component | 5.1 System | 7.1 System |
|---|---|---|
| Front Channels | 3 | 3 |
| Surround Speakers | 2 side | 2 side + 2 rear |
| Sound Localization | 180° range | 360° precision |
| Upgrade Path | Limited | Atmos-ready |
Your receiver must decode Dolby TrueHD or DTS-HD Master Audio formats to unlock full 7.1 potential. Look for models offering channel reassignment—this lets you repurpose unused amps for height speakers later.
The Role of Dolby Atmos and Auro 3D in Home Theater
Modern immersive audio formats transform compact rooms into three-dimensional soundscapes. Dolby Atmos and Auro 3D take different approaches to achieving this effect, each with unique strengths for spatial audio reproduction.

Comparing Immersive Audio Technologies
Dolby Atmos uses object-based audio, treating sounds as independent elements placed precisely in 3D space. Raindrops can land at specific heights, while helicopters circle overhead with pinpoint accuracy. This metadata-driven approach works particularly well in tight spaces with limited ceiling clearance.
Auro 3D employs a layer-based system, creating vertical sound columns that mirror your ear-level speakers. While less precise for object placement, it generates a cohesive ambient atmosphere. The Denon X3800H receiver demonstrates this difference—Atmos tracks retain positional data during upmixing, while Auro 3D processes existing channels into height layers.
| Feature | Dolby Atmos | Auro 3D |
|---|---|---|
| Sound Design | 128 individual objects | 3 vertical layers |
| Ceiling Speakers | 2-4 required | 1 “Voice of God” channel |
| Gaming Support | Xbox/PS5 native | Upmixed only |
| Content Library | 700+ Atmos titles | 50+ native mixes |
For competitive gaming, Atmos’ object tracking provides tactical advantages—you’ll hear footsteps directionally in Call of Duty. Movie lovers gain precise effects placement, like Marvel’s Doctor Strange spellcasting from specific ceiling points.
“Atmos delivers surgical precision, while Auro 3D wraps you in a sonic blanket—choose based on your content priorities,” advises THX-certified installer Marco Perez.
Both systems benefit from specialized speakers Dolby Atmos-enabled models or Auro-optimized height channels. Consider your room’s vertical space: Atmos needs 2-4 overhead units, while Auro 3D works with a single top-center speaker.
Selecting the Right Speaker Types for Tight Spaces
Space constraints demand creative solutions when choosing audio components. Your speaker selection impacts both performance and room flow, requiring careful balance between acoustic needs and spatial realities.

Surface-Mounted vs Recessed Designs
Bookshelf speakers like the Polk ES15 offer flexibility with angled stands for precise aiming. Their 8.5″ depth works well on floating shelves, while white finishes blend with light walls. For narrower spaces, consider repurposing center channel bars vertically—the Polk ES35C measures just 4.3″ deep yet delivers 90° horizontal dispersion.
| Type | Depth | Dispersion | Installation |
|---|---|---|---|
| Bookshelf | 8-12″ | Wide | Stand/shelf |
| In-Wall | 3.5″ | Controlled | Recessed |
| Soundbar (vertical) | ≤5″ | Directional | Wall-mounted |
Overhead Sound Strategies
Angled ceiling speakers like the KEF Ci160QR pivot 15° toward listening positions, crucial when seats sit close to walls. For renters or concrete ceilings, elevation modules such as the SVS Prime Elevation attach to front speakers, bouncing Dolby Atmos effects off overhead surfaces.
Coaxial designs in KEF Q150 speakers minimize vertical space while maintaining precise imaging—ideal for near-field listening. Their Uni-Q driver array projects sound evenly across compact rooms, reducing “hot spots” common with traditional separated tweeters.
“In-wall models save floorspace but require professional calibration to overcome boundary effects,” notes audio engineer Tina Marshall.
Optimizing Speaker Placement for Immersive Audio
Proper speaker arrangement transforms cramped rooms into acoustic powerhouses. Front left and right channels work best at 45-degree angles from your listening position—critical for precise dialogue and sound effects. Side surrounds should hover 12″ above ear level, positioned slightly forward to maintain directional cues without overwhelming nearby walls.

In compact spaces with seats against walls, prioritize 5.1.2 configurations over full 7.1 setups. This avoids rear channel congestion while preserving surround effects. Gaming setups demand special attention: position side speakers 6″ closer than standard recommendations to enhance positional audio accuracy in titles like Fortnite and Apex Legends.
| Speaker Type | Angle Range | Height | Use Case |
|---|---|---|---|
| Bookshelf | 45-60° | Ear level | Front channels |
| In-Ceiling | Direct downward | 7-8ft | Atmos effects |
| Satellite | 90-110° | 1ft above ears | Surround channels |
Asymmetrical rooms require clever compensation. Adjust receiver settings to balance sound levels between unevenly placed speakers. For example, increase the left channel by 3dB if your right speaker sits 2ft closer to seating.
Ceiling height impacts vertical staging. In rooms under 8ft tall, angle height channels downward at 15-30°. This creates overhead effects without creating “sound showers” that drown dialogue. Calibration tools like Audyssey MultEQ simplify these adjustments automatically.
“Treat speaker placement like chess—strategic positioning beats brute force every time,” says Dolby-certified installer Rachel Nguyen.
Deep Dive: How to Configure 7.1 Surround Systems in Tight Spaces

Calibrating multi-channel audio in compact environments requires rethinking traditional placement rules. Start by measuring distances between front speakers and seating—maintain at least 3ft clearance for proper dispersion. Side surround speakers perform best when angled 30° upward, reducing direct reflections from nearby walls.
Use this comparison table to adapt standard guidelines:
| Aspect | Traditional Guideline | Compact Adaptation | Benefit |
|---|---|---|---|
| Speaker Separation | 4-6 feet | 2-3 feet with 15° toe-in | Maintains imaging |
| Rear Channel Height | 2ft above ears | Ear level + diffusion panels | Prevents localization |
| Subwoofer Placement | Front corner | Nearfield + isolation pad | Tames boominess |
Modern receivers simplify complex setups. Run room correction software after physical positioning—this sequence prevents software from overcompensating for poor placement. Adjust crossovers to 120Hz for compact speakers, directing bass to properly placed subs.
“Nearfield calibration requires 40% less distance between components than traditional setups—use this to your advantage,” advises THX engineer David Wexler.
Phase alignment proves critical when surround speakers sit within 4ft of listeners. Test with pink noise tracks, adjusting delays in 0.1ms increments until effects pan seamlessly. Treat rear walls with bass traps to prevent low-frequency buildup in corners.
Furniture becomes acoustic infrastructure. Position bookshelves between side speakers to break up standing waves. Place listening chairs 18″ from rear walls to minimize early reflections. These adjustments transform spatial limitations into precision audio advantages.
Designing a Home Theater Layout for Gaming and Movies
Balancing cinematic immersion with competitive gaming requires smart spatial planning in compact environments. Modern OLED screens dominate wall space, forcing creative audio solutions that don’t compromise visual appeal. Your setup must serve two masters: precise positional cues for gaming and enveloping soundscapes for films.
Customizing Layout for Dual Use
Gaming demands aggressive rear channel activity—think Call of Duty bullet trajectories. Position surround speakers 6-12″ closer than recommended for movies. This compensates for rapid directional changes in first-person shooters. Front channels need wider dispersion for movie dialogue while maintaining laser focus for game UI sounds.
| Aspect | Gaming Priority | Movie Priority | Hybrid Solution |
|---|---|---|---|
| Rear Channels | 110° placement | 90-100° placement | Adjustable mounts |
| Subwoofer | Tactile feedback | Deep extension | Dual 8″ drivers |
| Center Channel | Minimal use | Dialogue clarity | Acoustically transparent screen |
Managing Visual Aesthetics in Small Rooms
Hide speakers behind acoustically transparent fabric panels matching your wall color. For 77-inch OLED displays, use slim-profile LCR speakers that tuck under the screen. Run wires through crown molding or paintable raceways to maintain clean sightlines.
Lighting sets the mood without cluttering space. Install LED strips behind media consoles—they enhance perceived depth while hiding equipment. Choose low-profile furniture with built-in cable management to keep controllers and headsets accessible yet invisible.
“Dual-purpose rooms thrive on illusion—make technology disappear until it’s needed,” says interior designer Elena Rodriguez.
Color coordination matters. Matte black speakers blend into dark room treatments, while white models mirror light walls. This visual trickery makes your home theater feel larger than its square footage.
Strategies for Phantom Center Channel Creation
Precision-matched front speakers can eliminate bulky center channels without sacrificing dialogue clarity. This approach uses your left and right speakers to create a “phantom” center image through careful calibration. The result? Cleaner sightlines and sound that appears to originate directly from your screen.
Sony’s A95L OLED demonstrates alternative solutions with its Acoustic Surface tech. The display itself becomes a center channel, vibrating to produce clear vocals. While innovative, traditional phantom setups often outperform compromised physical placements in tight rooms.
Optimize this technique with identical front models angled inward at 30-45 degrees. Enable receiver settings like “Center Spread” or “Virtual Speaker.” Proper alignment makes characters’ voices anchor to on-screen action—even when seated just 6 feet from your display.
FAQ
Can a 7.1 surround system work in small rooms?
Yes, but prioritize compact speakers like in-wall or bookshelf models. Position front and rear channels at ear level, and use elevation or ceiling speakers for Dolby Atmos immersion. Measure distances carefully to balance soundstage.
Are ceiling speakers necessary for Dolby Atmos in tight spaces?
While ceiling speakers deliver optimal height effects, upward-firing modules or wall-mounted elevation speakers work well in small rooms. Ensure they’re angled toward the listening position for realistic overhead audio.
How do bookshelf and in-wall speakers compare for tight setups?
Bookshelf speakers offer flexibility in placement and sound quality but consume floor space. In-wall models save room and blend with décor but require professional installation. Pair either with a subwoofer for full-range audio.
What’s the ideal distance between surround speakers and seating?
Keep rear and side channels 2-3 feet above ear level and 3-6 feet from the listening position. In small rooms, use directional speakers to minimize reflections and maintain channel separation.
Can I skip a center channel in a 7.1 system?
A phantom center channel can work if front left/right speakers are well-placed and matched. However, a dedicated center speaker ensures clearer dialogue, especially for off-axis listeners in compact spaces.
How do I manage bass in a small home theater?
Use a compact, high-quality subwoofer and place it near the front wall. Adjust crossover settings to blend with main speakers, and employ room correction software to tackle standing waves or bass buildup.
Do immersive formats like Auro 3D need more space than Dolby Atmos?
Auro 3D’s “height layer” requires additional overhead speakers, which can be challenging in tight rooms. Dolby Atmos offers more flexibility with fewer elevation channels, making it better suited for small spaces.
What’s the best layout for gaming and movies in one room?
Optimize speaker placement for a central seating area. Use adaptive audio modes on AV receivers to switch between gaming’s dynamic range and cinematic immersion. Hide cables and choose low-profile speakers to maintain aesthetics.
