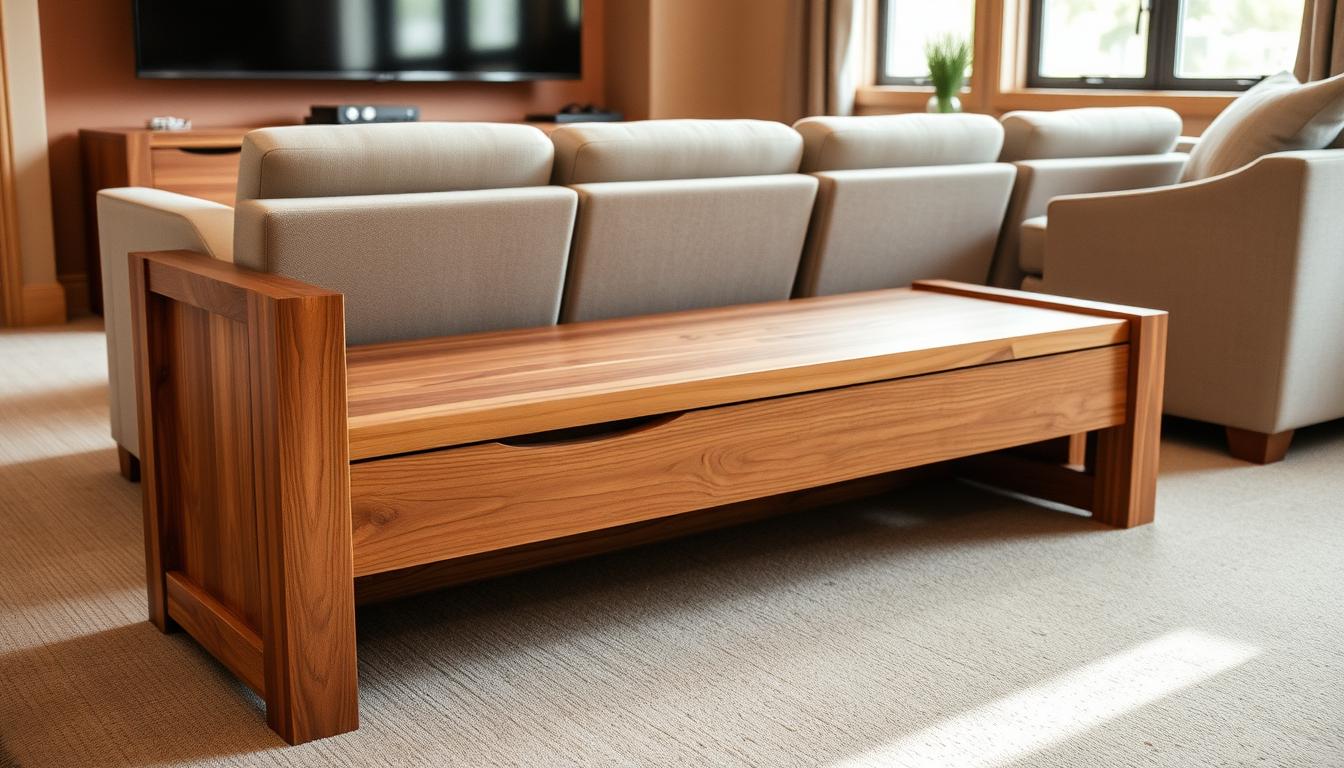

Did you know that 70% of homeowners wish they had more seating and storage in their entertainment spaces? A custom-built bench can transform your home theater room into a functional and stylish haven. This project combines practicality with creativity, offering a solution that fits your needs perfectly.
Building your own bench allows you to add extra seating while keeping your space organized. Using reclaimed wood or other materials, you can create a durable and eco-friendly piece. The process involves cutting, joining, and finishing techniques that ensure a professional result.
This guide includes detailed step-by-step instructions and video walkthroughs to help you visualize each step. Whether you’re a beginner or an experienced DIY enthusiast, you’ll find the process accessible and rewarding. Let’s dive into the tools, equipment, and methods that will make your project a success.
Key Takeaways
- Enhance your home theater room with a custom-built bench.
- Add extra seating and organized storage to your space.
- Use reclaimed materials for a creative and eco-friendly project.
- Follow detailed step-by-step guides and video walkthroughs.
- Learn practical woodworking skills for a professional finish.
Introduction
Transform your entertainment space with a custom-built solution that combines style and functionality. This project focuses on creating a multi-functional piece that enhances both seating and storage in your home theater. By selecting the right wood and material, you can achieve a durable and aesthetically pleasing result.

Project Overview and Benefits
A custom bench is more than just a place to sit. It’s a practical addition that keeps your space organized while adding a touch of elegance. Unlike store-bought options, a DIY build allows you to tailor the design to your specific needs. This ensures a perfect fit for your room’s layout and style.
Choosing the right material is crucial for longevity. Reclaimed wood, for example, offers an eco-friendly option that adds character to your project. The top surface can be customized with finishes that match your décor, making it a seamless addition to your home theater.
Why a Custom Storage Bench Suits Your Home Theater Room
A well-crafted bench not only improves functionality but also enhances the ambiance of your space. It provides extra seating for guests while offering hidden storage for blankets, remotes, or other essentials. This dual-purpose design makes it a versatile piece for any entertainment area.
When compared to commercially available benches, a DIY build stands out for its customization and durability. You can choose the exact dimensions, finishes, and features that suit your needs. Plus, building your own bench is often more cost-effective than purchasing a pre-made one.
“A custom bench is an investment in both style and practicality, offering a unique solution for your home theater.”
By focusing on quality wood and thoughtful design, you can create a piece that lasts for years. Whether you’re a beginner or an experienced DIYer, this project offers a rewarding way to enhance your space.
Planning and Materials Selection
The right materials and tools are the foundation of any successful DIY project. Proper planning ensures your build is efficient and meets your expectations. Start by selecting high-quality wood and supplementary materials that guarantee durability and a polished finish.

Selecting the Right Wood and Additional Materials
Choosing the best wood is crucial for both aesthetics and longevity. Reclaimed options like birch plywood or poplar lumber are eco-friendly and add character to your project. Consider the dimensions and availability of materials to match your home theater design.
Pay attention to the edge and corner details. These areas often require extra care to ensure a smooth appearance. Allocate sufficient time for edge cleanup and finishing to achieve a professional look.
Understanding the Detailed Cutting and Material List
A comprehensive material list is essential for staying organized. Include specific dimensions and quantities to avoid delays. For example, 3/4-inch birch plywood is ideal for the top and bottom panels, while poplar beams work well for the frame.
Plan for extra materials to account for mistakes. This saves time and ensures you have enough supplies. Use tools like circular saws and miter saws for precise cuts, especially around corners.
“A detailed plan and quality materials are the keys to a successful build.”
By focusing on these steps, you’ll create a durable and stylish piece that enhances your space. Proper planning and material selection make the entire process smoother and more enjoyable.
Tools and Equipment Essentials
Having the right tools can make or break your DIY project. Whether you’re cutting, joining, or finishing, the equipment you choose directly impacts the quality of your build. This section covers the essentials you’ll need to create a durable and polished piece.

Power Tools Versus Hand Tools
Power tools like circular saws, routers, and table saws are ideal for efficiency and speed. They handle large cuts and repetitive tasks with ease. However, hand tools like chisels and sandpaper are better for precision work, especially around edges and corners.
Here’s a quick comparison:
| Tool Type | Benefits | Drawbacks |
|---|---|---|
| Power Tools | Fast, efficient, handles large tasks | Requires safety precautions, less precision |
| Hand Tools | Precise, better for detailed work | Time-consuming, physically demanding |
For example, a router with the right bit can create clean edges, while a hand plane ensures a smooth finish. Combining both types ensures a balanced approach to your project.
Essential Tools for Joining and Cutting
Specific tools are critical for tasks like creating a sturdy frame or cutting materials to size. A table saw is perfect for straight cuts, while a miter saw handles angled cuts. For joining, clamps and wood glue are indispensable.
Safety is also a priority. Always wear protective gear like safety glasses and hearing protection. Regularly maintain your tools to ensure they perform well throughout the project.
“The right tool not only saves time but also enhances the quality of your finished piece.”
By selecting the right tools and using them safely, you’ll achieve professional results that enhance your space. Whether you’re a beginner or an experienced DIYer, these essentials will guide you every step of the way.
Preparing the Wood: Cutting and Cleaning Techniques
Proper wood preparation is the cornerstone of any successful DIY project. Accurate cutting and cleaning techniques ensure your materials are ready for assembly, resulting in a polished and professional finish. This step is critical for achieving clean edges and smooth surfaces that enhance the overall quality of your build.

Using Circular Saws, Table Saws, and Routers Effectively
Start by measuring and marking your wood to the correct dimensions. Use a circular saw with a straight edge guide for precise cuts. For larger pieces, a table saw is ideal for ripping wood 2mm wider than needed, allowing room for edge cleanup.
Routers are essential for creating smooth rebated edges. Choose the right bit for your design and work slowly to avoid splintering. Always secure your material with clamps to prevent movement during cutting.
Edge Cleanup and Sanding for a Smooth Finish
After cutting, focus on edge cleanup. Use a hand plane or sandpaper to smooth rough edges. Start with 100-grit sandpaper and progress to 150-grit for a polished finish. This step ensures your wood is ready for staining or painting.
Safety is crucial during this process. Wear protective gear like safety glasses and hearing protection. When drilling holes or placing clamps, double-check measurements to avoid mistakes.
“Proper wood preparation not only enhances the appearance but also ensures a strong and durable final product.”
- Measure and mark wood accurately before cutting.
- Use clamps to secure materials during sanding and cutting.
- Progress through sandpaper grits for a smooth finish.
- Follow safety precautions when using power tools.
By mastering these techniques, you’ll create a high-quality piece that enhances your home theater setup. For more tips on optimizing your space, check out this guide on enhancing your home theater setup.
Crafting a Wooden Storage Bench for a Home Theater Room
Assembling a custom piece for your space starts with precise planning and execution. Begin by laying out all wood pieces on a sturdy table. This ensures you have everything ready for the initial assembly of the box form.
Applying glue effectively is crucial for strong bonds. Use a high-quality wood adhesive like DAP’s Carpenter’s Glue. Spread it evenly along the edges where pieces will join. Clamp the pieces together tightly to ensure a secure bond as the glue dries.

Accurate cuts are essential for a seamless fit. A circular saw is ideal for this task. Measure twice and cut once to avoid mistakes. Double-check each component to ensure it fits perfectly within the box framework.
Alignment is key to a professional finish. Verify that all pieces are correctly positioned before securing them. Use clamps to hold everything in place while the glue sets. This step ensures stability and makes finishing easier later.
“Careful assembly now saves time and effort during the finishing process.”
- Lay out wood pieces on a flat table for easy access.
- Apply glue evenly and clamp pieces securely.
- Use a circular saw for precise cuts and proper fit.
- Check alignment and secure all components before moving forward.
By following these steps, you’ll create a durable and well-structured box that enhances your space. Proper preparation and attention to detail ensure a professional result.
Joining Techniques and Frame Assembly
Building a sturdy frame is essential for ensuring the longevity and stability of your project. Proper joining techniques and precise alignment are key to achieving a professional finish. This section covers the methods and tools you’ll need to assemble a durable frame.
Doweling, Gluing, and Clamping Methods
Doweling is a reliable way to join wood pieces securely. Start by drilling holes of the correct length into the edges of your materials. Apply wood glue to the dowels and insert them into the holes. Clamp the pieces together tightly to ensure a strong bond.
Using the right tool for clamping is crucial. Bar clamps or pipe clamps work well for larger projects. Ensure the clamps are evenly spaced to avoid warping. Allow the glue to dry completely before moving to the next step.
Precision is critical when aligning joints. Double-check measurements to ensure each piece fits perfectly. This attention to detail will save time during the final assembly and paint application.

Fastening Options: Screws, Nails, and Hinges
Choosing the right fastener depends on the project’s requirements. Screws provide a strong hold and are ideal for load-bearing areas. Use 1 1/2-inch Kreg jig screws for a secure fit, especially with 3/4-inch boards.
Nails are quicker to install but may not offer the same strength. They work well for trim or decorative elements. Hinges, like piano hinges, are perfect for creating movable parts, such as a storage lid.
Here’s a comparison of fasteners:
| Fastener | Best Use | Pros | Cons |
|---|---|---|---|
| Screws | Load-bearing areas | Strong, durable | Requires pre-drilling |
| Nails | Trim, decorative pieces | Quick installation | Less secure |
| Hinges | Movable parts | Allows movement | Requires precise alignment |
When installing hinges, ensure they are aligned correctly. Misalignment can cause uneven movement or strain on the frame. Use a level to verify alignment before securing the hinges.
Overcoming common challenges, like maintaining the correct length and alignment, is easier with the right tool. For example, a miter saw ensures precise cuts, while a square guarantees perfect angles.
By mastering these techniques, you’ll create a frame that’s both functional and durable. For more tips on optimizing your space, check out this guide on building a dedicated home theater room.
Creating a Custom Bench Top and Panel Rebate
Creating a custom bench top requires precision and attention to detail to ensure a seamless fit with the panel rebate. This step is crucial for achieving a polished and professional finish. By focusing on accurate marking, drilling, and reinforcement techniques, you can create a durable and visually appealing piece.

Marking, Drilling, and Reinforcement Techniques
Start by marking the plywood accurately. Use a measuring tape and pencil to outline the dimensions of the bench top. Double-check your measurements to avoid errors during cutting and drilling.
Drilling precise holes is essential for joining the panels. Use a cordless drill with a sharp bit to ensure clean holes. For added stability, reinforce the joints with wood glue and clamps. This step ensures the board remains secure during assembly.
Using a router with a rebate bit is key to preparing the bench top. This tool creates smooth edges and ensures the panel rebate fits perfectly. Work slowly and carefully to avoid splintering or uneven surfaces.
“Precision in marking and drilling is the foundation of a sturdy and professional-looking bench top.”
Maintaining consistency in material thickness is vital. Measure each piece of plywood to ensure uniformity. This prevents gaps or misalignment during assembly. Use a sanding block to smooth any rough edges before final assembly.
Here’s a quick comparison of tools for this step:
| Tool | Purpose | Best Use |
|---|---|---|
| Router | Creating smooth edges | Panel rebate preparation |
| Cordless Drill | Drilling precise holes | Joining panels |
| Sanding Block | Smoothing rough edges | Final surface preparation |
By following these techniques, you’ll create a custom bench top that enhances the functionality and appearance of your project. Precision and attention to detail ensure a professional result.
Fine-Tuning Finishing Touches
The final touches on your project can make all the difference in achieving a polished and professional look. This stage involves sanding, staining, and applying paint to protect and enhance the appearance of your piece. Attention to detail here ensures long-term durability and a refined finish.
Sanding, Staining, and Paint Application Strategies
Start with a thorough sanding process to smooth the surface. Use P220-grit sandpaper for a fine finish, working in the direction of the grain. This step removes imperfections and prepares the wood for staining or painting.
When staining, apply a dark tone to match the plywood panels with solid wood rails. Use a brush or cloth for even coverage, and wipe off excess stain to avoid blotches. Allow it to dry completely before moving to the next step.

For paint application, begin with a primer or undercoat to ensure adhesion. Use a high-quality brush or roller for smooth, even layers. Apply at least two coats of exterior paint for durability and protection against wear.
Correcting minor flaws is essential for a flawless finish. Use wood putty to fill visible nail holes or gaps. For misaligned hinges, adjust the screws or reposition them for a perfect fit. These small fixes enhance the overall appearance.
“Patience and precision during finishing ensure a professional result that lasts for years.”
Incorporating trim details adds a refined touch. Use 2″ x 1″ trim boards for decorative edges, securing them with nails or screws. This step not only enhances aesthetics but also provides additional support to the structure.
By following these strategies, you’ll achieve a polished and durable finish that elevates your project. Take your time, and don’t rush the process—quality finishing touches are worth the effort.
Adding Functional Hardware and Accents
Functional hardware and accents are the final elements that bring your project to life. These components not only enhance usability but also add a polished look to your piece. From hinges to decorative finishes, each detail plays a role in ensuring durability and style.
Installing Hinges, Chains, and Support Pieces
Start by attaching butt hinges to the top of your project. Mark the placement carefully to ensure symmetry and smooth operation. Use a drill to create pilot holes, then secure the hinges with screws. This step ensures the top opens and closes effortlessly.
For added support, install chains at the back. Measure the correct length to prevent the top from overextending. Secure the chains with screws, ensuring they are evenly spaced. This small addition enhances stability and prevents wear over time.

When marking the placement of hardware, use a tape measure for precision. Double-check measurements to avoid misalignment. This attention to detail ensures a professional finish and seamless functionality.
Adding a decorative coat can elevate the overall design. Choose a finish that complements your space, such as a matte or glossy paint. Apply it evenly, allowing each layer to dry completely. This not only enhances appearance but also protects the surface.
“The right hardware and accents transform a functional piece into a work of art.”
Finally, verify the alignment of all components. Ensure hinges and chains are securely installed, and the top operates smoothly. This final check guarantees a durable and visually appealing result.
Alternative Builds: Beginner Versus Advanced Options
Choosing the right build plan is essential for achieving your DIY goals. Whether you’re new to woodworking or have years of experience, there’s an option that fits your skill level. This section explores simplified methods for beginners and enhanced techniques for intermediate builders, helping you create a functional and stylish piece.

Simplified Build Option for Beginners
If you’re just starting out, a simplified build plan is the way to go. Focus on basic tools and straightforward techniques to create a functional piece. Use pre-cut materials to save time and ensure accuracy. This approach minimizes complexity while still delivering a polished result.
Understanding your available space is crucial. Measure the area where the piece will go to determine the right width. A smaller design is often easier to manage for beginners. Keep a list of materials and tools handy to stay organized throughout the process.
For added support, use simple joining methods like screws and wood glue. These techniques are beginner-friendly and provide a sturdy foundation. Sanding and painting can add a professional touch, even with a basic build.
Intermediate Build with Enhanced Techniques
For those with more experience, intermediate builds offer greater customization and durability. Incorporate advanced techniques like doweling or rebated edges for a refined finish. These methods require precision but result in a more robust structure.
Pay attention to the width and space requirements to ensure a perfect fit. Intermediate builders can handle larger designs, but careful planning is still essential. Create a detailed list of materials and tools to avoid delays.
Enhanced support features, such as reinforced frames or hidden storage, add functionality. Use a router for smooth edges and a professional look. Intermediate builds allow for creative freedom while maintaining structural integrity.
“The right build plan ensures a project that’s both functional and visually appealing, no matter your skill level.”
By selecting the appropriate plan, you can create a piece that meets your needs and enhances your space. Whether you’re a beginner or an experienced DIYer, these options provide a clear path to success.
Project Tips, Tricks, and Troubleshooting
Mastering the art of DIY woodworking involves learning from common mistakes and refining your techniques. This section provides practical advice to help you avoid pitfalls and achieve a polished result. Whether you’re working with pine or other materials, these tips will guide you through the process.
Common Pitfalls and How to Avoid Them
One of the most frequent issues is inaccurate measurements. Always double-check your dimensions before cutting. Misaligned drilled holes can also cause problems. Use a template or jig to ensure precision when drilling.
Working with a table saw requires extra caution. Always use a push stick to keep your hands safe. Ensure the blade is sharp and properly aligned to avoid uneven cuts. These small steps can prevent costly mistakes.
Another common challenge is material warping, especially with pine. Store your wood in a dry, temperature-controlled room to minimize this issue. Proper storage ensures your materials remain stable throughout the project.
Troubleshooting Assembly Issues
If parts don’t fit together, check for misaligned drilled holes. Re-drill if necessary, ensuring the holes are straight and properly spaced. For larger pieces, use clamps to hold everything in place during assembly.
When using a table saw, blade burn marks can occur. Adjust the feed rate or blade height to prevent this. Sanding the affected area can also help restore the finish.
Safety and Work Area Maintenance
Keep your workspace clean and organized. Clutter can lead to accidents, especially when handling power tools. Always wear safety gear, including goggles and gloves, to protect yourself.
Store your tools properly after each use. This not only extends their lifespan but also ensures they’re ready for the next task. A well-maintained room enhances both safety and efficiency.
“Taking the time to troubleshoot and refine your process ensures a smoother build and a professional finish.”
- Double-check measurements to avoid inaccuracies.
- Use templates for precise drilled holes.
- Maintain a clean and safe workspace.
- Store materials in a controlled room to prevent warping.
- Follow safety protocols when using a table saw.
By addressing these common challenges, you’ll create a durable and visually appealing piece. A methodical approach minimizes errors and ensures a successful project.
Conclusion
Completing this project brings both functionality and style to your space. By following a detailed plan, you’ve created a piece that enhances seating and organization. From selecting materials to applying finishing touches, each step contributes to a polished result.
Proper techniques, like using a clamp during assembly, ensure stability and durability. Sanding and staining add a professional finish, while functional hardware like hinges and chains improve usability. These details make your project both practical and visually appealing.
Feel free to adapt the plan to suit your unique needs and workspace. Whether you’re a beginner or an experienced DIYer, this project offers a rewarding experience. The sense of accomplishment from building something functional and stylish is unmatched.
Take pride in your work and consider tackling similar projects in the future. With the right plan and techniques, you can transform any space into a functional and beautiful area. Your efforts will continue to pay off for years to come.
FAQ
What type of wood is best for building a storage bench?
Pine and plywood are excellent choices due to their durability and ease of use. Pine offers a classic look, while plywood provides stability and cost-effectiveness.
What tools are essential for this project?
You’ll need a circular saw, table saw, router, drill, clamps, and sanding tools. These ensure precise cuts, smooth edges, and a professional finish.
How do I ensure the bench is sturdy and durable?
Use doweling, gluing, and clamping methods for strong joints. Reinforce the frame with screws and nails, and add support pieces for extra stability.
Can I customize the size of the bench to fit my space?
Yes, adjust the length, width, and height to suit your room. Measure the area carefully and modify the cutting list accordingly.
What finishing techniques should I use?
Sand the surface thoroughly for a smooth feel. Apply a coat of paint or stain to match your decor, and seal it for added protection.
How do I install hinges for the storage lid?
Mark the placement carefully, drill pilot holes, and attach the hinges with screws. Ensure they align properly for smooth opening and closing.
Are there beginner-friendly options for this project?
Absolutely. Start with a simplified design using basic tools and techniques. Focus on straight cuts and straightforward assembly.
What are common mistakes to avoid?
Avoid uneven cuts, improper measurements, and skipping sanding steps. Double-check your work and take your time to ensure accuracy.
How can I add decorative accents to the bench?
Use trim pieces, routed edges, or a contrasting finish. These details enhance the appearance and make the bench a standout piece.
What’s the best way to clean and maintain the bench?
Wipe it down regularly with a damp cloth. Reapply finish or paint as needed to keep it looking fresh and protect the wood.
