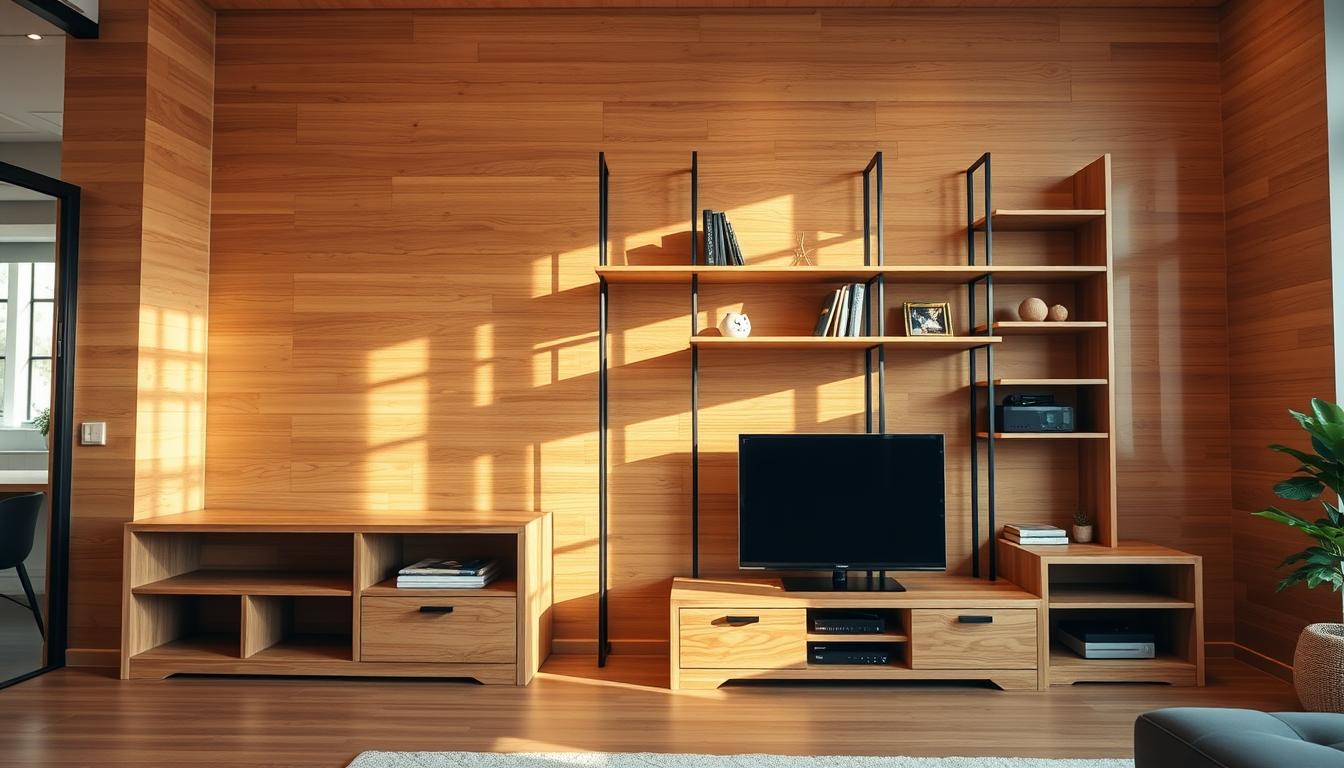

Did you know that the average DIY enthusiast spends 2-3 hours on prep work before building a custom entertainment center? This project combines functionality and style, transforming your living space into a hub for family memories. Using materials like plywood and tools such as a circular saw and power drill, you can craft a piece that looks professionally installed.
This guide will walk you through every step, from cutting plywood to assembling cabinet frames. You’ll learn how to install trim, secure wall studs, and create a seamless built-in look. Whether you’re a seasoned DIYer or a beginner, this project is designed to bring warmth and modern aesthetics to your home.
With detailed instructions and safety tips, you’ll master techniques like using a Kreg jig for pocket holes and drilling precise cutouts. By the end, you’ll have a custom entertainment center that fits your space perfectly. Ready to get started? Let’s dive in!
Key Takeaways
- Learn how to build a custom entertainment center using plywood and essential tools.
- Discover tips for cutting, assembling, and installing cabinet frames with precision.
- Understand the importance of securing cabinets to wall studs for stability.
- Explore techniques for adding trim and finishing touches for a professional look.
- Get step-by-step guidance to create a functional and stylish piece for your home.
Planning Your Multi-Purpose Entertainment Unit
Proper planning is the backbone of any successful DIY project, especially when building a custom entertainment center. Taking the time to assess your space, gather materials, and prepare tools ensures a smooth and efficient process. This phase sets the foundation for a piece that’s both functional and visually appealing.
Assessing Your Space and Configuration
Start by measuring your room and the area where the unit will sit. Consider the width of your TV and the surrounding space for shelves or storage. Dry fitting cabinets before assembly helps you visualize the final look and ensures everything fits perfectly.
Locate wall studs using a stud finder and mark their positions. This step is crucial for securely anchoring the base cabinets. Proper ventilation and cable access should also be part of your plan to avoid future issues.

Gathering Tools, Materials, and Safety Precautions
Having the right tools and materials is essential for this project. You’ll need a circular saw for cutting plywood, a drill for assembling the frame, and safety glasses to protect your eyes. A clamp system can help hold pieces in place while you work.
Here’s a checklist to get started:
- Ready-to-assemble cabinets or veneer-faced plywood
- 1 ¼” Kreg pocket hole screws for secure joints
- Trim and molding for a polished finish
- Paint or stain for the final look
Careful planning ensures all pieces align perfectly, creating a cohesive and professional result. Take your time during this phase to avoid mistakes later.
Step-by-Step Guide for Creating a Multi-Purpose Entertainment Unit with Wood
Crafting a functional and stylish piece starts with accurate measurements and proper tools. This section will guide you through constructing the base cabinet and frame, followed by installing built-in elements and shelving. By following these steps, you’ll create a seamless and professional-looking entertainment center.
Constructing the Base Cabinet and Frame
Begin by cutting the plywood pieces for the cabinet. Use a circular saw to ensure clean edges and precise lengths. Measure twice and cut once to avoid mistakes. For the sides, middle, and shelves, you’ll need two panels, leaving the remaining two untouched for later use.
Next, drill pocket holes using a Kreg jig. These holes will secure the joints, ensuring the frame is sturdy. Drill four holes per panel for maximum stability. Assemble the frame using 1 ¼” pocket hole screws, aligning each piece carefully. Use clamps to hold the pieces in place while you work.

For the face frame, attach rails and stiles using brad nailers. This step adds strength and a polished look to the cabinet. Make sure everything is level and square before securing the pieces permanently. Liquid nails can be applied for extra durability.
Installing Built-In Elements and Shelving
Once the base cabinet is complete, it’s time to add shelving. Measure the interior space to determine the shelf lengths. Cut the boards to size and sand the edges for a smooth finish. Use 9mm dowels to prevent sagging and ensure the shelves are level.
Install the shelves by anchoring them securely to the cabinet walls. Check for alignment using a level and adjust as needed. For built-in elements like cable management, drill a 60mm diameter hole just above the shelves. This allows for easy access and proper ventilation.
Finally, secure the back panel using 1/4” plywood. This adds stability and completes the cabinet structure. Double-check all connections and ensure the unit is firmly anchored to the wall studs for safety.
By following these steps, you’ll have a sturdy and functional entertainment center. Take your time, prioritize safety, and enjoy the process of creating a piece that enhances your space.
Enhancing Functionality and Aesthetic Details
Transform your entertainment center into a polished masterpiece with these finishing techniques. Adding the right details not only improves its look but also boosts its functionality. From paint and trim to lighting, these steps will help you achieve a professional result.
Adding Finishing Touches with Paint, Trim, and Inlays
Start by applying wood filler to any gaps or seams on the cabinet front. Sand the surface smooth for a flawless finish. Use a router to detail the edges of doors and built-in elements, creating soft, curved finishes that enhance the design.
Next, attach trim pieces to the cabinet frame. Secure them with nails or screws, ensuring they align perfectly. For a seamless look, fill any nail holes with wood filler before painting. Choose a color that complements your space, like Puritan Pine stain or Untinted Satin White for a modern vibe.
Integrating Lighting and Custom Display Features
Lighting can elevate the overall look of your piece. Mount LED lights under shelves or inside cabinets for a soft glow. Use a staple gun to conceal cords along the back panel, keeping the design clean and organized.
For custom display features, create a shelf lip using plywood. This adds depth and makes items stand out. Ensure all elements are level and aligned for a polished finish. These small details make a big difference in the final look.
| Material | Purpose | Tools Needed |
|---|---|---|
| Wood Filler | Seal gaps and seams | Putty knife, sandpaper |
| Trim Pieces | Enhance cabinet edges | Nails, screws, hammer |
| LED Lights | Add ambient lighting | Staple gun, drill |
| Plywood | Create shelf lips | Circular saw, clamps |
By focusing on these finishing touches, you’ll create a piece that’s both functional and visually stunning. Take your time, measure carefully, and enjoy the process of bringing your vision to life.
Conclusion
Building a custom entertainment center is a rewarding DIY project that combines functionality and style. From planning to final touches, every step requires precision and the right tools. Using materials like plywood and techniques such as pocket hole assembly ensures a sturdy and professional piece.
Safety is key throughout the process. Always wear protective gear and double-check measurements before cutting or drilling. Securing the cabinet to wall studs guarantees stability, while adding trim and paint enhances its look.
Personalize your design with custom finishes, lighting, and decorative touches. Whether you choose open shelves or hidden storage, this project transforms your space into a functional hub. For more tips on designing a dedicated entertainment area, check out this guide.
Share your results with online communities for feedback and inspiration. With careful planning and execution, you can create a professional-quality entertainment center that elevates your home.
FAQ
What tools are essential for building a multi-purpose entertainment unit?
You’ll need a circular saw, drill, level, pocket hole jig, and measuring tape. These tools help ensure precise cuts, secure joints, and a professional finish.
How do I determine the right size for my entertainment unit?
Measure your wall space and the dimensions of your TV or other devices. Ensure the unit fits comfortably without overcrowding the room, leaving enough space for trim and wall studs.
What type of wood is best for this project?
Plywood is a popular choice for its durability and affordability. For a more polished look, consider using hardwood for the face frame or trim.
How do I ensure the unit is level during installation?
Use a level to check the base cabinet and frame as you assemble them. Secure the unit to wall studs for added stability.
Can I customize the shelving and storage options?
Yes, you can design adjustable shelves, drawers, or cabinet doors to suit your needs. Plan the layout based on the items you want to store or display.
What’s the best way to finish the unit for a professional look?
Sand the surfaces smooth, apply paint or stain, and add trim or inlays for detail. Consider integrating lighting to highlight specific areas.
How do I attach the unit securely to the wall?
Locate the wall studs and use screws to anchor the back panel or frame. This prevents tipping and ensures safety.
What’s the easiest way to cut plywood for this project?
Use a circular saw with a guide for straight cuts. Measure twice and cut once to avoid mistakes.
How can I add doors to the cabinet section?
Build a face frame and attach hinges to the cabinet doors. Ensure they align properly and open smoothly.
What safety precautions should I take during construction?
Wear safety goggles, gloves, and a dust mask. Keep your workspace clean and ensure all tools are in good condition before use.
