
It doesn’t matter if you’re watching movies in your living room, man cave, or home theater; adding a surround sound system will enhance the experience.
The speakers integrated into your TV cannot reproduce the low-frequency bass produced by an explosion or the subtle footfall produced by a speaker system.
If you’re shopping for speakers, you may be unsure whether to acquire a 5.1 or 7.1 system. However, 7.1 is a better option than 5.1 in today’s world. Why?
One of the most significant advantages of purchasing a 7.1 home theater system is that more speakers equal a more realistic sound. With two back channels, surround sound becomes an intense experience.
The following context will provide all the information you require to understand what surround sound is and how to connect a 7.1 surround system perfectly.
Let’s continue!
What Does “Surround Sound” Mean
Audio systems with many speakers positioned around the listener are referred to as “surround sound.” As a result of a surround sound system, you may hear noises from all angles.
What do I need for a 7.1 Surround Sound System
A 7.1 system includes a center channel speaker, two front-channel speakers, a single subwoofer, two rear-channel speakers (one on each side of the rear channel), and two left- and right surround speakers.
However, you will get more immersive sound by utilizing the rear surround speakers instead of just two and distributing the sound across four speakers instead of two.
Furthermore, the two extra speakers also aid in filling up bigger rooms. Nowadays, 7.1 formats use in films. It makes them more attractive.
THE CENTER CHANNEL
To get the best sound, place your center channel speaker in front of where you’ll be listening to the music (see Fig. B).
Make sure the speaker’s leading-edge is flat with the shelf or stand’s edge to keep the conversation clear.
THE FRONT SPEAKERS
Front speakers on either side of the screen should be six feet apart and equal distance from the best viewing position.
Some toe-in could be helpful to improve the experience. If this is the case, make certain that each speaker is positioned at the same angle and distance from the viewing location as the others.
THE SURROUND SOUND SPEAKERS
A pair of surround speakers (indicated as “A” in Fig. D) must be placed on either side of the viewing location, somewhat above and behind the viewing position.
Three feet above (and behind) each listener’s head is an ideal placement for the left and right rear surround speakers (labeled “B”).
THE SUBWOOFER
Subwoofers are often placed in corners, along walls, and close to front speakers. However, a few changes can improve the bass sound.
When setting up a 7.1 system in a room that does not meet these precise parameters, it’s OK!
In addition, not everyone is blessed with the luxury of a room that is open, rectangular, and replete with strategically placed electrical outlets.
How do I Connect My 7.1 Surround Sound to My Receiver
Put your receiver near your TV
You must be able to plug the receiver into the TV and a power supply. Don’t lock up your receiver since it may need to release heat.
Examine your speakers’ connections
Most surround sound systems feature connectors for each speaker to plug into.
However, older systems include speaker wire clamps. To do this, strip some wire using wire cutters and clip it to the speaker’s back.
Run a wire from each speaker to the receiver
Hide your cables as you run them to avoid people or animals from yanking your speakers.
If possible, put cables under the carpet or through the wall.
Leave sufficient slack at either end to prevent strain.
Link speakers
Connect your speaker cable to one speaker, then another in order. Ideally, each speaker should be connected to the other front speaker.
AV wires link the speakers to the receiver. Don’t wire front speakers together.
Unless instructed, leave out the subwoofer. Subwoofers usually plug into the receiver.
Connect the subwoofer
Most subwoofers connect through AV cables.
“Sub out” or “sub-pre-out” is the receiver’s subwoofer port. Connect to the “LFE in” or far-left input if your subwoofer has several inputs.
Plug your receiver into a power source
If this is the first time you’re setting up your receiver, it may take several minutes to come online.
Connect the receiver to the TV
Connect the TV to the receiver’s HDMI Out connector using HDMI for optimal results. Older connections (AV cables) will produce lesser quality. Modern TVs have HDMI.
After everything is linked, turn on your TV to see the results.
How Do I Connect 7.1 Surround Sound to My Back Speakers
As shown in the diagram (Fig: F), wire up each speaker in order.
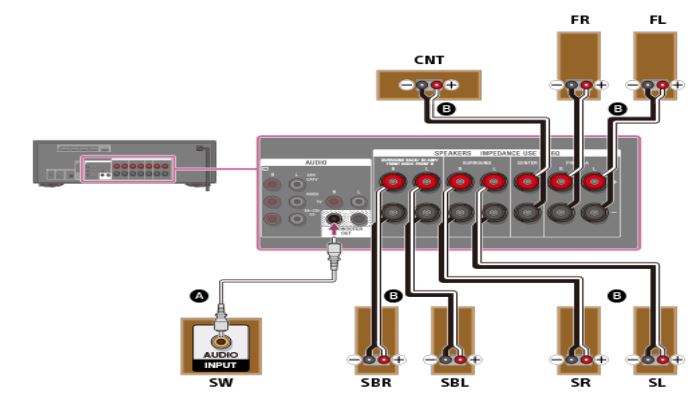
Ensure the AC power cord is disconnected before attaching any wires (mains lead). Set [Speaker Setting] – [Surround Rear Speakers Assign] to [Surround Back Speakers] from the home menu after connecting the surround back speakers.
How do You Run Surround Sound Wires?
You may use various methods to route the room’s wiring for surround sound speakers. We’ve discovered that the approaches may be divided into three broad categories:
1. Using baseboards and baseboard molding to run surround sound cables.
2. Using a crawlspace or attic access to wire surround sound speakers.
3. Crown molding can be used to run cables for surround sound.
What Cable Do I Need for Surround Sound?
It is strongly advised that if you want wire of the highest quality, you go for something that is manufactured of copper.
Copper-plated or copper-clad aluminum wire is an excellent alternative, and there is no discernible difference in the sound quality between these two types of wire. However, if you aim to save a little bit of money, you may use solid copper wire instead.
How do I Hook Up My 7.1 Surround Sound to HDMI
If you have a gaming console, DVD player, or cable box, you may route their audio through your surround sound system by plugging these devices into the receiver. Additional HDMI cables will be required to connect the receiver to the inputs.
It is common for receivers to have HDMI (High Definition Multimedia Interface) in/out connections (e.g., “IN 1”, “OUT 1”, etc.).
An HDMI device connected to “HDMI IN 1” requires an HDMI cable to be connected to both the receiver’s “HDMI OUT 1” port and the TV’s “HDMI 1” port.
However, the same applies to older products that employ AV or composite connections (the red, yellow, green, blue, and white sets of cables).
Bottom Line
After hookups, try surround sound. Each TV has a distinct manner of configuring audio, but you can usually modify it by hitting Menu on the remote, selecting audio, and locating the default output region.
Most modern surround sound systems include an automatic setup method that involves placing a microphone in the viewing area and allowing the speakers to detect the amount of background noise.
Before making any changes to your speakers, you should first update the settings on your TV and any other components connected to the surround sound system.
