
Over 40% of home entertainment system failures originate from power-related issues in the central hub. This critical component processes audio and video signals from your devices, amplifies sound, and connects your entire setup through streamlined inputs. When it stops working, your movie nights and gaming sessions grind to a halt.
Modern units combine advanced circuitry with delicate power supply systems. These sensitive electronics face risks from voltage spikes, overheating, and aging components. A single malfunction can disable every connected speaker and display.
You’ll start by recognizing clear warning signs: blank screens, unlit indicators, or total unresponsiveness. Systematic troubleshooting separates simple fixes from complex internal failures. Begin with basic power checks before examining fuses, cables, or internal boards.
Electrical surges remain the leading cause of sudden shutdowns. Even brief outages can damage capacitors or transformers. Proper diagnosis requires understanding how these parts interact within your system’s architecture.
Key Takeaways
- Your entertainment hub processes signals from multiple devices while amplifying audio output
- Power-related failures often stem from electrical surges or component degradation
- Diagnosis begins with checking cables, outlets, and basic power supply functions
- Internal circuitry requires careful inspection for blown fuses or damaged capacitors
- Safety protocols prevent accidental shocks during repairs
Overview of Home Theater Receiver Functions and Common Issues
At the heart of every immersive home cinema experience lies a critical component often overlooked until it fails. This technological workhorse manages audio video signals from gaming consoles, streaming devices, and media players while coordinating outputs to speakers and displays.

The Role of AV Receivers in Media Systems
Your receiver acts as the system’s brain, merging six core functions into one unit. It amplifies weak audio signals to theater-level volumes without distortion, routes 4K video to compatible screens, and decodes surround sound formats like Dolby Atmos. Advanced models even adjust sound profiles based on your room’s acoustics.
Modern units simplify complex setups through HDMI switching, letting you connect multiple devices through a single cable. Network connectivity transforms them into smart hubs for music streaming and voice commands. “The best receivers disappear into the background until you need their power,” notes AV integrator James Carter.
Understanding Signal Management
When you play content, the receiver performs three crucial tasks:
- Separates combined audio/video streams
- Enhances audio clarity through digital processing
- Maintains synchronization between dialogue and visuals
Delicate circuitry handles these operations simultaneously. Overheating, power surges, or outdated firmware often disrupt this precision engineering. You’ll notice issues through frozen menus, intermittent sound drops, or failure to recognize connected devices.
Identifying No Power Issues in Your Receiver
Silent equipment often signals deeper electrical problems. Before assuming internal damage, methodically eliminate simple causes. Start with visible checks before progressing to complex diagnostics.

Recognizing the Symptoms of a Dead Receiver
A completely unresponsive unit shows three clear signs. No glowing standby lights appear near the power button. The front display stays dark during startup attempts. Cooling fans remain silent despite repeated power cycles.
These symptoms differ from partial failures like distorted audio or flickering video. “Total power loss usually stems from supply chain interruptions,” explains certified technician Mara Lin. Verify these indicators before disassembling components.
Checking the Power Source and Connections
Begin with outlet verification using another device like a lamp. Test multiple sockets to rule out localized electrical problems. Inspect the power cord for frayed wires or bent prongs at both ends.
| Symptom | Immediate Check | Verification Method |
|---|---|---|
| No LED indicators | Outlet functionality | Multimeter test |
| Dark front panel | Power cable integrity | Visual inspection |
| Silent operation | Circuit breaker status | Breaker panel review |
Document findings in your manual’s troubleshooting section. Persistent issues after these checks suggest internal component failure requiring professional attention.
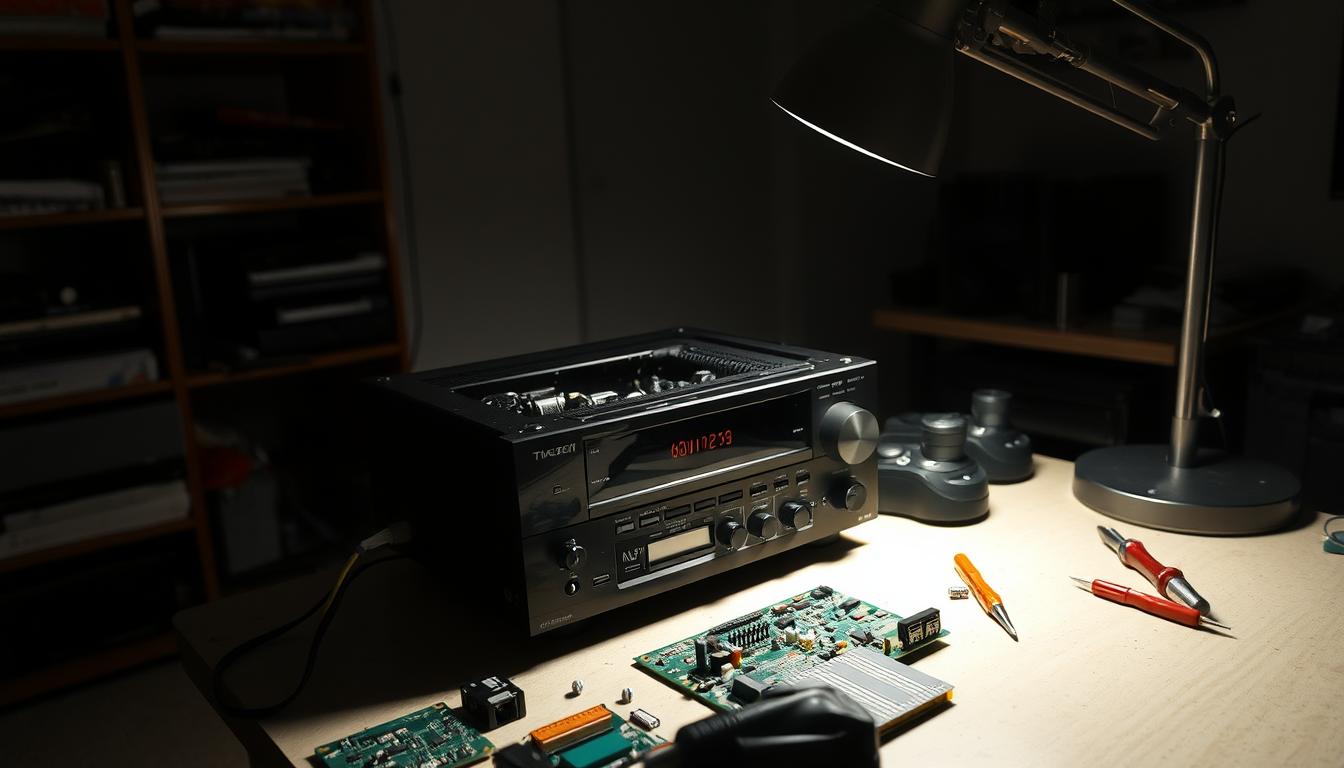
How to Repair a Home Theater Receiver That Won’t Power On
When your entertainment hub falls silent, strategic diagnostics become essential. Start with physical interactions before exploring internal components. This methodical approach separates temporary glitches from hardware failures.

Step-by-Step Troubleshooting Process
First, disconnect the unit from its power source for 60 seconds. This allows protective circuits to reset. Press the physical power button on the front panel to eliminate remote control issues.
Inspect internal fuses if basic checks fail. Remove the cover carefully and look for discolored or broken elements. Use a multimeter to verify voltage reaching the main board. “Many units fail due to simple fuse replacements,” notes AV technician Lila Moreno.
Reset Procedures and Diagnostic Tips
For persistent issues, initiate a factory reset using the button combination specified in your manual. Disconnect all peripherals during this process to isolate the problem. Test with only essential cables connected.
Document each attempt systematically. If troubleshooting reveals connectivity problems with smart home devices, address those separately after restoring basic functions. Always reference your manufacturer guide for model-specific protocols.
Securing and Inspecting Connections
Proper connection integrity forms the backbone of any reliable entertainment system. Loose or damaged links between components often trigger protective shutdowns in modern receivers. Start with visible inspections before progressing to advanced diagnostics.
Verifying Video and Audio Cable Connections
Examine all HDMI and optical cables for bent connectors or cracked insulation. Ensure each plug seats fully in its port without forced insertion. Test alternative cables to rule out signal transmission failures.

Evaluating Speaker Wire Integrity and Placement
Follow this systematic approach to identify load-related issues:
- Disconnect all speakers from terminals to test receiver startup
- Inspect wire ends for stray copper strands causing short circuits
- Measure continuity between positive/negative conductors using a multimeter
Reconnect one speaker at a time while monitoring for protection mode activation. This isolates problematic connections affecting power delivery.
Considering the Role of Surge Protectors
Bypass power strips temporarily to eliminate failed surge suppression as the culprit. Test your receiver in different wall outlets using its original cable. For persistent issues, consult our guide to troubleshoot common preamplifier issues that often accompany power irregularities.
Resetting and Restoring Default Settings
Modern entertainment systems store customized configurations that sometimes conflict with normal operations. When standard troubleshooting fails, restoring original parameters often resolves persistent power issues. This process clears corrupted data while maintaining core functionality.

Performing a Factory Reset Correctly
Locate your model’s specific reset sequence in the manual. Most units require holding Dimmer + Source buttons while plugging in the power cord. Keep buttons pressed until the display flashes red twice.
| Step | Action | Verification |
|---|---|---|
| 1 | Unplug for 5 minutes | No standby lights visible |
| 2 | Initiate button combo | Display shows “RESET” |
| 3 | Release when prompted | Setup menu appears |
Restoring the Receiver to Its Original Settings
Document existing equalizer presets and input labels before resetting. After restoration, test basic functions without connected devices. Power cycle three times to confirm stability.
Successful resets show default volume levels and neutral sound profiles. If issues persist, consult authorized service centers for firmware updates or component replacements.
Deciding Between Repairing or Replacing Components
Facing a malfunctioning entertainment hub? Weighing repair costs against replacement options requires strategic evaluation. Modern systems often reach a tipping point where upgrades become more practical than fixes.

Cost Analysis: Repair vs. Replacement
Compare repair estimates to current market values using this framework:
| Factor | Repair Threshold | Replacement Trigger |
|---|---|---|
| Age | Under 5 years | Over 7 years |
| Repair Cost | ≤ 40% of new unit price | ≥ 60% of new unit price |
| Tech Features | Supports current standards | Lacks HDMI 2.1/8K |
Newer models often provide better energy efficiency and warranty coverage. Units older than eight years rarely justify major component replacements.
Warranty and Professional Repair Considerations
Check your warranty status first. Most manufacturers cover parts and labor for three years. “Units under protection plans should always go through authorized channels,” advises technician Roland Pierce.
For out-of-warranty systems:
- Obtain three repair quotes minimum
- Verify service center certifications
- Confirm parts availability for discontinued models
Consider factory-refurbished options with updated components when repair costs exceed $300. These often include fresh warranties and modern connectivity features.
Preventative Measures and Maintenance Tips
Consistent maintenance keeps your entertainment hub performing optimally. Simple routines extend equipment lifespan while preventing sudden failures. Follow these strategies to maintain peak performance year-round.
Regular Firmware Updates and System Checks
Your receiver relies on updated software to manage power distribution and network connectivity. Manufacturers release patches every few months addressing stability issues and compatibility conflicts. Enable automatic updates or check manually through the system menu.
| Update Type | Frequency | Key Benefits |
|---|---|---|
| Security Patches | Quarterly | Prevents unauthorized access |
| Feature Updates | Biannually | Adds new input formats |
| Bug Fixes | As released | Resolves power management glitches |
Perform monthly system tests by cycling power three times consecutively. Verify all ports recognize connected devices and protection circuits activate during speaker load tests.
Ensuring Proper Ventilation and Avoiding Overloads
Heat accumulation remains the top cause of premature component failure. Maintain three inches of clearance around all vents in your entertainment room. Use compressed air every six months to clear dust from internal pathways.
| Component | Clearance Needed | Maintenance Action |
|---|---|---|
| Top Vent | 4 inches | Monthly surface cleaning |
| Side Vents | 3 inches | Biweekly inspection |
| Rear Ports | 2 inches | Annual contact cleaning |
Prevent voltage drops by connecting directly to wall outlets rather than power strips. Monitor operating temperatures during movie marathons – if surfaces feel hot, install auxiliary cooling fans behind the unit.
User Experiences and Real-Life Fixes
Real-world scenarios reveal critical patterns in equipment failures. These case studies highlight solutions verified through hands-on troubleshooting.
Case Study: Power Outage and Receiver Shutdown
A Maryland homeowner experienced total receiver failure after a neighborhood blackout. Despite using a Belkin Pure AV surge protector, only the central hub refused to power on post-outage. Technicians traced the problem to a tripped protection circuit in the power supply board.
Key lessons emerged:
- Surge protectors don’t guarantee immunity from voltage irregularities
- Modern units prioritize self-protection over immediate functionality
- Delayed power restoration often requires manual system resets
Case Study: Resolving Speaker Wire Issues
An Arizona user battled persistent receiver shutdowns despite proper power connections. The culprit? Over-inserted bare speaker wire strands causing short circuits. Careful reinstallation with proper terminal spacing resolved the issue completely.
This situation underscores three critical practices:
- Maintain visible copper at wire ends without excessive length
- Use banana plugs for secure, foolproof connections
- Test each channel individually during troubleshooting
FAQ
Why won’t my receiver turn on even after checking the outlet?
If the receiver plugged into a working outlet still won’t power on, inspect the internal fuse or circuit breaker. Many units have a replaceable fuse near the power cord. A blown fuse often indicates a surge or overload. Also, test the power cable for damage—swap it with one from another device to confirm.
How do I reset a receiver stuck in protection mode?
Disconnect all speaker wires and components, then unplug the receiver for 2-3 minutes. Plug it back in and press the power button. If it turns on, reconnect one speaker at a time to identify a short circuit. Faulty wiring or loose strands touching metal often trigger protection mode.
Can a factory reset fix power-related issues?
Yes. Hold the Standby and CBL/SAT buttons (varies by brand) for 5 seconds to restore default settings. This clears software glitches causing startup failures. Refer to your manual for exact reset steps, as incorrect methods may erase custom configurations.
Should I repair a 10-year-old receiver or buy a new one?
Compare repair costs to newer models with HDMI 2.1, Dolby Atmos, or Wi-Fi streaming. If repairs exceed 50% of a replacement’s price, upgrading is smarter. Check if your unit is under warranty—many brands offer 3-5 years of coverage for parts and labor.
Do speaker wire issues prevent a receiver from powering on?
Yes. Exposed wires touching the receiver’s chassis or each other create a short circuit, forcing the unit into protection mode. Use a multimeter to test wire continuity. Replace damaged cables and ensure connections are secure but not over-tightened.
How often should I update my receiver’s firmware?
Check for firmware updates every 3-6 months via the receiver’s network menu. Updates fix bugs affecting power management or audio/video signal processing. Always use a stable internet connection during updates, and avoid turning off the unit mid-process.
Can a surge protector cause power issues?
Faulty surge protectors or power strips with worn outlets may not deliver consistent voltage. Test the receiver by plugging it directly into a wall outlet. If it powers on, replace the surge protector with a UL-listed model rated for home theater systems.
Why does my receiver turn off immediately after starting?
Overheating from blocked vents or stacked components is a common cause. Ensure at least 3 inches of clearance around the receiver. Use a can of compressed air to clean dust from internal circuits, focusing on the power supply and amplifier sections.
